|
|

HOW TO properly remove a 2nd Gen Fbody inner door panel.
This will guide you step by step in removing the inner door panel
on your Camaro or Trans Am.
The process is an easy one and requires very little tools.
The door panel we are removing is from a 1981 Trans Am Nascar edition.
-[ CLICK pictures for larger images ! ]-
1) YOU WILL NEED THE FOLLOWING TOOLS:
* Normal-Tipped Phillips Head Screwdriver
* Large-Tipped Phillips Head Screwdriver
* Thin-Tipped Regular Head screwdriver
* Standard Sized C-clip Remover
* Regular Claw Hammer (Optional)
|

|

|
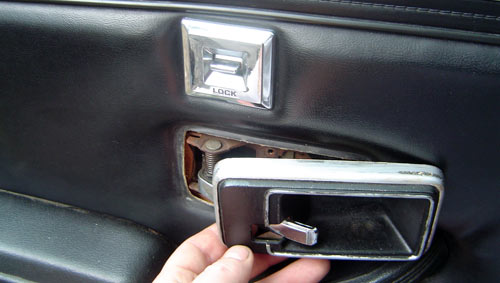
2) DOOR HANDLE CUP REMOVAL - First you will want to remove the door handle cup. This
is a simple process. Simply remove the Phillips head screw
and then pull back on the door handle. This allows the cup
to slide outward and be removed.
|
3) REMOTE MIRROR ADJUSTER REMOVAL - The next task is to remove the driver's side mirror adjuster plate. If you're working on
passenger side inner door panel, then move to next step.
The plate is held in place by two Phillips head screws that screw into a metal trim plate that's located on the rear side of the door panel, (see attached pic below).
If you are tossing your rotted-out door panel in favor of a 'fresher model', remember to grab that plate off the rear side of the door panel. If you forget... you can always fabricate a unit that will work from thin gauge metal.
Then, go ahead and remove the two screws that hold the adjuster retainer onto the panel. Once the screws are out, the plate will come outward a few inches.
Next, you will see a hog ring retainer on the rear side. Simply pull the clip on one side and then the other to remove it. Now the trim plate will slide out
of the adjuster.
|


|


|
4) LOCK STEM & RING REMOVAL - Next comes the lock pole stem and ring. The lock trim pole simply unscreWs off the threaded metal pole. The trim
ring can be pulled right off, IF it is loose. If not, you will
need to wait until the panel is off to remove it. it has 3
bendable clips on the rear side. If you are reinstalling the
door panel, you will NOT need to remove the trim ring... only
the plastic stem pole.
Once you remove these panels, I suggest greasing and lubricating all the inner lock mechanism working parts before reinstalling the trim.
It's a good idea to lube the locking mechanism(s) even if just replacing or redying the panels, as a part of your maintenance program.
A thin coating of heavy gear lube/axle grease will work, as well as a spray lubricant such as PB Blaster or WD-40.
|
3) ARMREST / DOOR PULL REMOVAL - The armrest & doorpull removal step comes next. There are three large-headed Phillips head screws holding the armrest / doorpull on.
Chances are some one had replaced them at some point and they could very well be standard flat head screws. One is located at to top of the arm, one at
midsection and the other towards the rear. Remove all 3 and
the armrest simply falls off.
This is also a good time to replace your cracked, torn, and/or missing armrest / doorpull. If you're lucky, your armrests / doorpulls are in useable condition... however, most of the driver's side units were destroyed over the years because of an inferior design by the engineering department over at GM.
Extra large & heavy doors w/ sagging door hinges, combined w/ the thin vinyl armrest / doorpull created a recipe for disaster on the driver's door.
|


|
6) DOOR PANEL REMOVAL -"Got patience?" This is a BIT tricky, so be patient and DO NOT force it. If it does not come right off, you simply are not doing it right. Be patient and try again!
The panel is secured to the door by 6 metal clips and 4-6 plastic trim clips. I suggest starting at the bottom corner and working over and up on each side. The plastic clips are located across the bottom.
Using a trim clip remover OR a claw hammer, feel around and you will be
able to locate the general area of the trim clip. ALWAYS
get your tool between the clip and the door, NOT the clip and
the panel as you can damage the backer on the panel if not
done correctly.
Once you have slid you tool under the clip, pry lightly outward. A small piece of tape stuck on the clip once popped from the door will prevent the clip
from sliding right back in as you move onto other clips. The goal is to have ALL the clips once the panel is off still connected to the panel and NOT the door frame. This ensures no damage to the door panel backer AND allows for very
little audjustments when reinstalling.
Once all the clips are removed, you need to pop the top of the door panel rail out of the top of the door. Do this by pushing the door panel
about 3 inches forward towards the nose of the car. The back
will lift right now with some coaxing. You may need to
wiggle front to back a few times to get it lined up to pop
up and out on the rear side.
The front of the door panel the toughest to free. You want to push on the top front edge of the door panel, about 4 inches back from the very front. Push
on this top rail towards the outside of the door (towards the mirror side) and at the same time lift gently up and off. This once again can take some time and effort but you do NOT want to break that inner plastic rail. Now the panel
is off... FINALLY !!
|
6) DOOR POWER LOCK SWITCH REMOVAL -If you have power locks, before the panel can come completely out, you need to remove the power lock wiring from the switch. Simply pull the wiring off by hand or use a flat head screw driver, prying outward and off on the wiring harness. The switch can be removed by bending the 4 flaps inward, sliding it through the precut hole in the door panel.
NOTE* On some late Second Gen Camaros and Trans Ams, you
will see a thick rubber strip that runs left to right on the
bottom of the door panel. This was used as a sound barrier
to prevent road noise in the cabin and also to prevent water
on the rear side of the door panel cardboard. This is held
in place by the clips we have already removed in the previous step. It may still be attached to the door frame by some glue. Simply pull gently up and off from side to side.
If you are lucky and your panel has never been off, the
factory Tar Paper will still be hanging on as this one is.
These are glued on and after 20+ years you can pull
them off. Now you have a bare door skeleton to work with.
At this point, you can grease your window tracks,
adjust the felts felts, and so on and so on. Simply follow the
above steps in reverse order to replace the panel.
If you need trim clips, feel free to browse our online store,
as we sell them indiviudaly or in complete sets!
|
We at Fbodywarehouse hope this restoration tip helps in the preservation of your Fbody!
|
|
|
 Home
Home  About
Us
Contact Us
About
Us
Contact Us  Pace Car Registry
  Site
Map
Site
Map