|
|

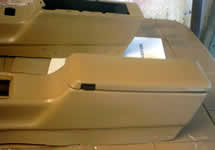
The center console box assembly is the same for '73-'81 Camaros and all '70-'81 Trans Ams.
The good news is that nearly all of the restoration parts are still available;
feel free to browse our Online Store to pick up any parts you may need for the job.
This section will allow you to complete all of the following tasks:
** Replace a broken console box latch.
** Replace a broken console box bin.
** Replace a factory console box bin spring.
1) To remove the console box from the center console you will need to remove 2 small bolts that bolt the console box onto the center console. These are located on the bottom of the center console bin box. One is to the far front and the other to the far rear.
2) Once you remove these bolts, pull gently up on the complete box unit and angle the box toward the front passenger side so the console box lid arm and spring will clear the corner of the center console.
|
|
|
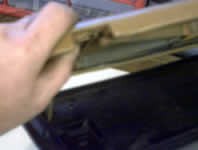
3) On the inside of the console box you will notice 5 phillips head screws. Remove these screws, working from the rear of the console bin to the front. These screws secure the console box padded lid to the actual box.
|
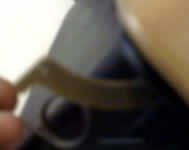
4) In this photo, you will notice the spring located on the front passenger side corner of the lid. To remove the actual padded lid, you will need to remove this spring.
If only replacing a broken latch you can SKIP this step!
The spring is held by tension and simply slides in and out. This can be tricky so take your time and take a moment to see the correct position before proceding!
|
|
|
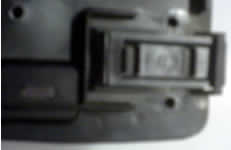
5) Once you lift the padded console lid away from the bin liner, you will see the actual latch assembly.
This consists of the latch push button and a small half-moon spring.
Take a flat head screwdriver and pry up and the spring and it will pop right off. Then slide the latch button forward and off.
|
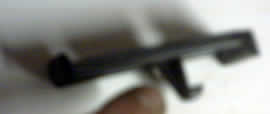
6) The latch assembly needs to have the lower hanging grabber on it to operate properly.
If this stud has broken off your latch, replace it with an operational unit that should be in the condition of the one shown.
|
|
|
7) To reinstall the latch; simply slide the new latch back into place, followed by the rear half moon spring. Reference the above noted steps in reverse to aid in installation.
*A suggestion, go smoothly when reinstalling the phillips head screws. START at the far front screws that hold the latch assembly tight to the pad.
This will prevent the latch spring from popping out while tightening the unit down.
|
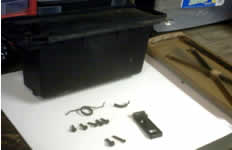
The picture above is a complete breakdown of all the parts that make up your console box and bin.
We at Fbodywarehouse hope this restoration tip helps in the preservation of your Fbody!
|
|
|
 Home
Home  About
Us
Contact Us
About
Us
Contact Us  Pace Car Registry
  Site
Map
Site
Map


